Squama Ethernet with CAN FD
INTRODUCTION
Squama is a series of products. This series of products has a standard appearance, with a general size of 62x30mm. The series integrates an MCU and peripherals with communication function, which is suitable for IoT-related applications.
Squama Ethernet with CAN FD is the second product in the Squama series. The board integrates a high-performance microcontroller based on Cortex M4 and an Ethernet control chip W5500, which can be used by users to develop Ethernet as well as CAN FD applications.
WS2812 LED and user buttons are also integrated on the board, which can facilitate some interaction. More importantly, Squama Ethernet with CAN FD supports PoE (Power Over Ethernet), which makes the wiring more concise. Only one network cable is needed to complete signal transmission and power supply.
You can use Arduino IDE to develop your application ealisy.
FEATURES
- both CAN-FD and CAN2.0
- ATSAME51G19A 32bit Cortex M4 core
- 512 KB flash, 192KB RAM
- PoE
- Supports Hardwired TCP/IP Protocols : TCP, UDP, ICMP, IPv4, ARP, IGMP, PPPoE
- Supports 8 independent sockets simultaneously
- Supports Power down mode
- Supports Wake on LAN over UDP
- Supports High Speed Serial Peripheral Interface(SPI MODE 0, 3)
- Internal 32Kbytes Memory for TX/RX Buffers
- 10BaseT/100BaseTX Ethernet PHY embedded
- Supports Auto Negotiation (Full and half duplex, 10 and 100* based )
- Not supports IP Fragmentation
- WS2812B Led
- Reset Button and User Button
- Grove connector for I2C and UART
SPECIFICATIONS
- MCU: ATSAME51 32bit Cortex M4 core
- Clock speed: 120MHz
- Flash memory: 512KB
- RAM: 192KB
- EEPROM: No EEPROM
- Input voltage: 5V via USB and 48~57V via PoE
- Output Current @ 5V: 2A
- Size: 62x30 mm
- Weight: 15g (without PoE), 20g (with PoE)
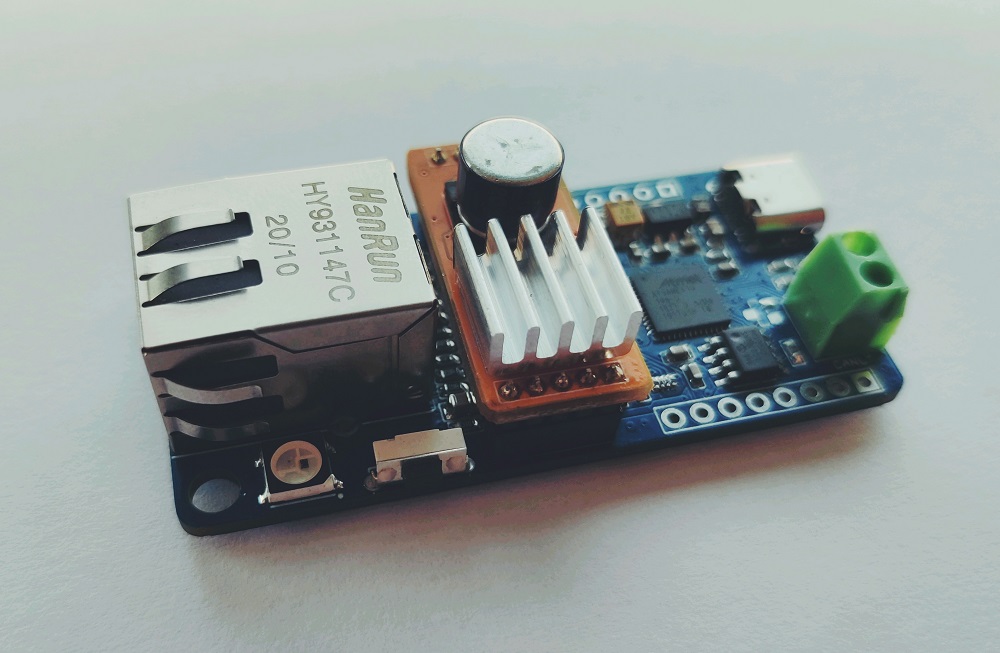
HARDWARE OVERVIEW
PART LIST
- Squama Ethernet Dev Board x 1
- PoE Cape x 1
- 5pin header (male and female)
- 8pin header (male and female)
HARDWARE OVERVIEW

1. LED indicators:
- R: Reset (red)
- P: Power (green)
- L: D13 (blue)
2. RJ45 Connector, 10/100M
3. WS2812B LED, connected to D12
4. User button, connected to D11
5. PoE Cape
6. Pinout1
7. I2C
8. UART (Use Serial2 in the code)
9. TypeC connector for programming
A. Pinout2*
B. Reset Button
C. ATSAMD21G18 chip
PIN OUTPUT
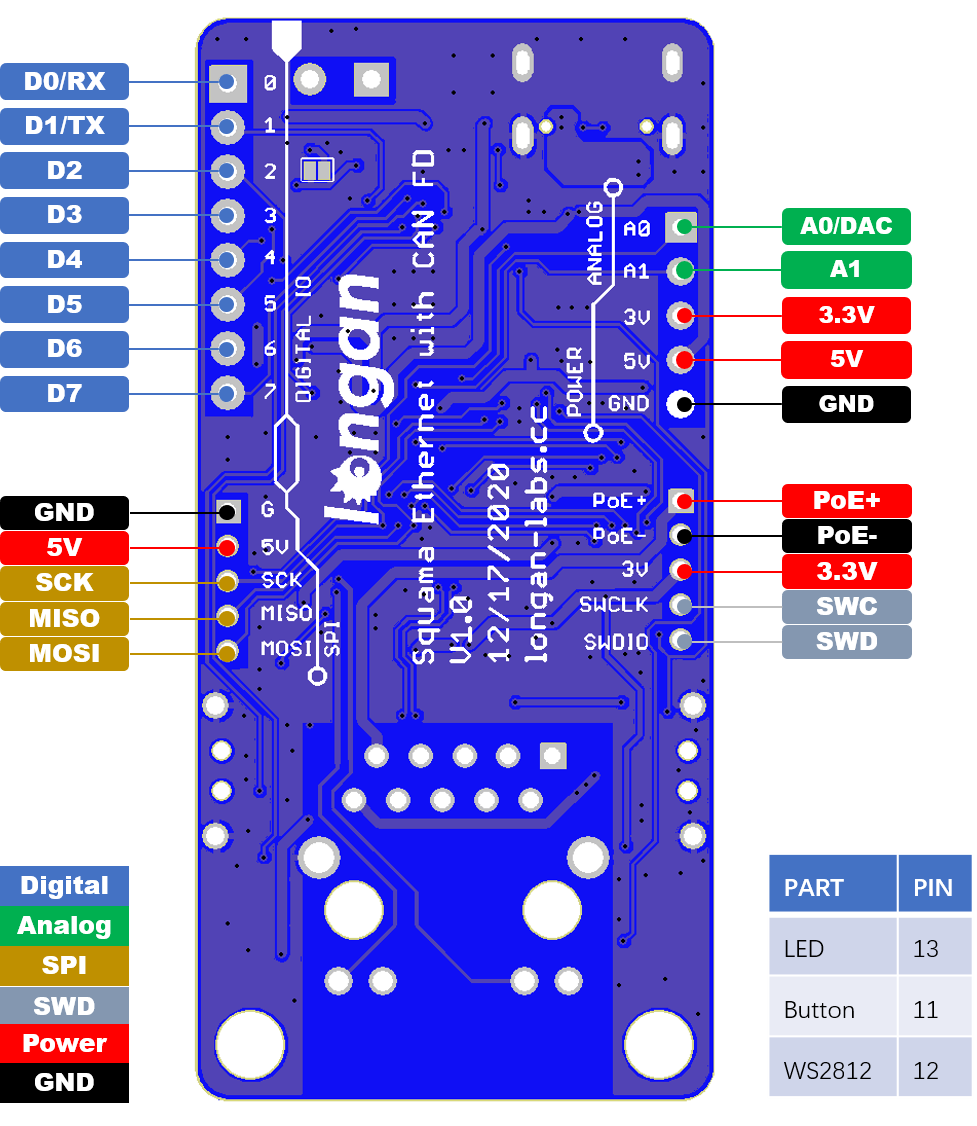
Note
The RX/TX use Serial1 in the code
Arduino IDE Setup
First download the Arduino IDE from https://www.arduino.cc/en/Main/Software. Arduino IDE can be installed and run on Windows, Linux, and Mac OS X operating systems. Download the installer or zip file (Windows only) and install (if you have the zip file, extract it to your Windows computer’s hard drive) it on your operating system.
Once finished, start the Arduino IDE.
Copy and paste the link below into the Additional Boards Manager URLs option in the Arduino IDE preferences (File > Preferences).
https://raw.githubusercontent.com/Longan-Labs/LONGAN-SAME-TOOLS/master/package_longan_samd_index.json
Enter longan to install the latest Longan SAME board
Usage
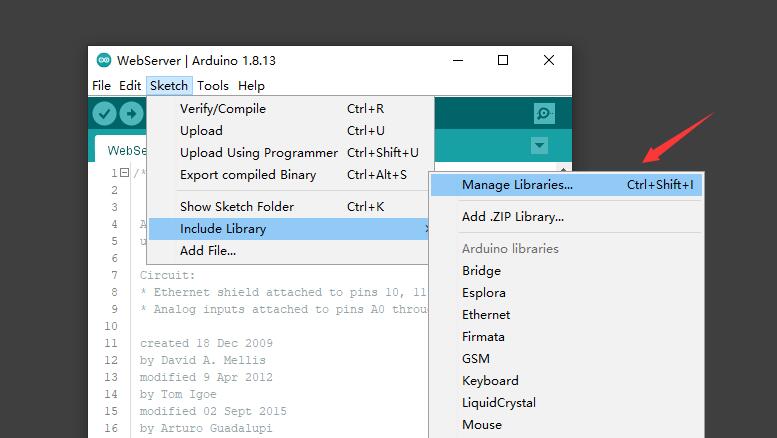
Install Ethernet Library
The Arduino Ethernet library work well with Squama Ethernet dev board.
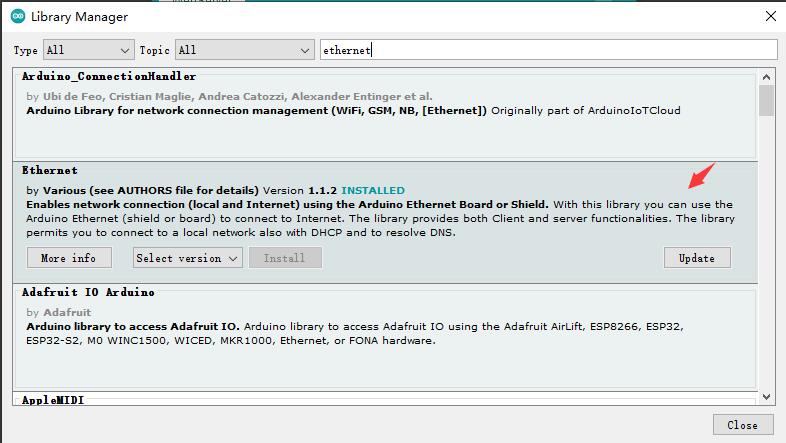
Lets start by installing the library, open your Arduino IDE, Sketch > Include Library > Manage Libraries...
Input ethernet, you will find the library, make sure you are running at V2.0.0 or higher.
Connect Cable
Here you need a network cable and a TypeC cable. Connect the Squama Ethernet Dev Board to the router through the network cable and to the computer through the TypeC cable.
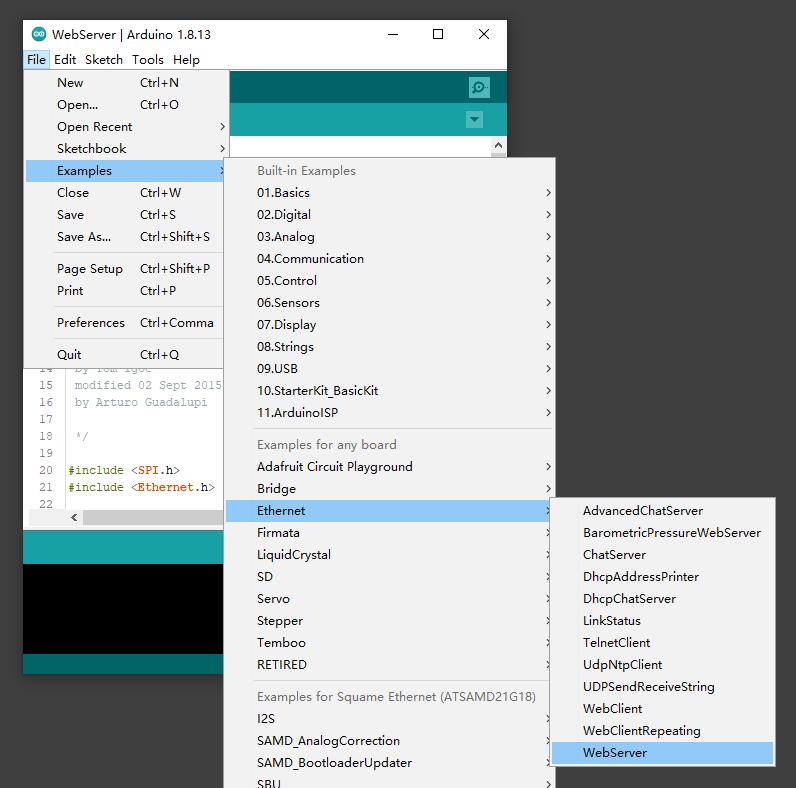
Run Example Code (WebServer)
We take WebServer as an example. First open the code of WebServer.
Some parts of the code may need to be modified. If your router limits the mac to the Internet, then you need to modify the mac address. And the IPAddress on line 28 of the code needs to be modified to the same segment as your gateway address. My gateway address is 192.168.31.1, so I changed my IPAddress to 192.168.31.177. If you use a Windows operating system computer, You can get your gateway address through win+R > cmd > ipconfig.
// Enter a MAC address and IP address for your controller below.
// The IP address will be dependent on your local network:
byte mac[] = {
    0xDE, 0xAD, 0xBE, 0xEF, 0xFE, 0xED
};
IPAddress ip(192, 168, 31, 177);
After the code is uploaded successfully, open the Serial Monitor.
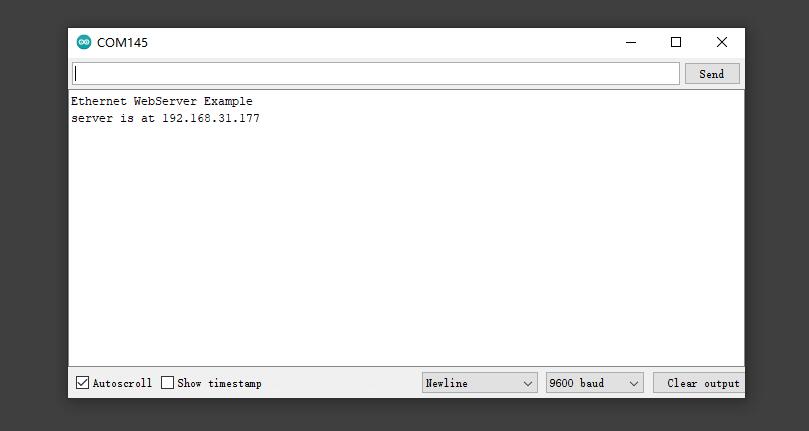
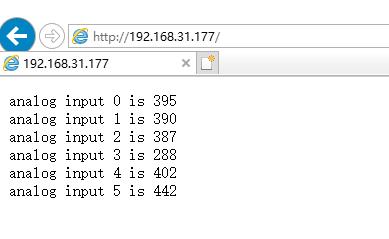
Open the web browser and enter the address displayed on the Serial Monitor, you can get the data sent by Squama Ethernet.
The library also contains a lot of practical examples, including the following, not to introduce them here.
- AdvancedChatServer
- BarometricPressureWebServer
- ChatServer
- DhcpAddressPrinter
- DhcpChatServer
- LinkStatus
- TelnetClient
- UdpNtpClient
- UDPSendReceiveString
- WebClient
- WebClientRepeating
- WebServer
CAN Bus
We provide an Arduino library for Squama Ethernet with CAN-FD.
There're many examples for the library, which is consist of,
- CAN_20_Send - How to send a frame to CAN Bus 2.0
- CAN_20_Recv - How to recv a frame from CAN Bus 2.0
- CAN_FD_Send - How to send a frame to CAN FD
- CAN_FD_Send - How to recv a frame from CAN FD
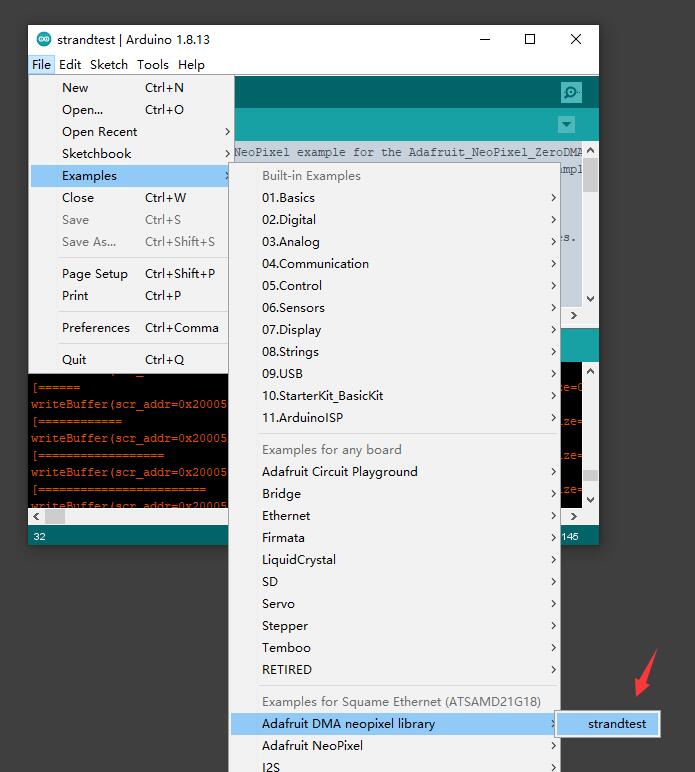
Use the WS2812B on the board
We already add the library to the examples.
Open Arduino IDE, File > Examples > Adafruit DMA neopixel library > strandtest.
Use the USR button on the board
const int pinBtn = 11;
const int pinLed = 13;

void setup()
{
    pinMode(pinBtn, INPUT_PULLUP);
    pinMode(pinLed, OUTPUT);
}

void loop()
{
    int ledst = 1-digitalRead(pinBtn);
    digitalWrite(pinLed, ledst);
    delay(100);
}
FAQ
1.The board can't be connected to the Internet
- See if the Green Led light up in the RJ45 connector